Ubuntu (Gnome) 20.04 – versehentliche Display Rotation rückgängig machen

Es ist mir hier mit meinem Notebook nun schon öfters passiert, dass in Folge des Herumtragens versehentlich die Display-Anzeige automatisch gedreht wurde (auf Hochformat), wie man das von Smartphones kennt.

Offensichtlich wird von Ubuntu/Gnome hier auf ein Sensorsignal des Notebooks zurückgegriffen. Die Problematik bei meinem Gerät: Eine Rückstellung auf horizontale Ansicht erfolgt leider nicht mehr.

Ein Befehl auf der Konsole [https://askubuntu.com/a/1154632], der die Anzeige in die ursprüngliche Position bringt, hilft:

xrandr -o normal

Es empfiehlt sich, die Funktion zu deaktivieren. Dies ist im Traymenü möglich.

Configure VPN-Connection to Fritzbox under Ubuntu 20.04

Step 1 – Create VPN-User within Fritzbox Admin Menu:

Create user with VPN privileges (System -> User; Deutsch: System -> Benutzer)
and accept to view credentials for Android and iOS.

Keep this information for Step 3!

Step 2 – Install necessary packages on Linux Client:

sudo apt install vpnc network-manager-vpnc-gnome

Step 3 – Configure new connection on Linux Client:

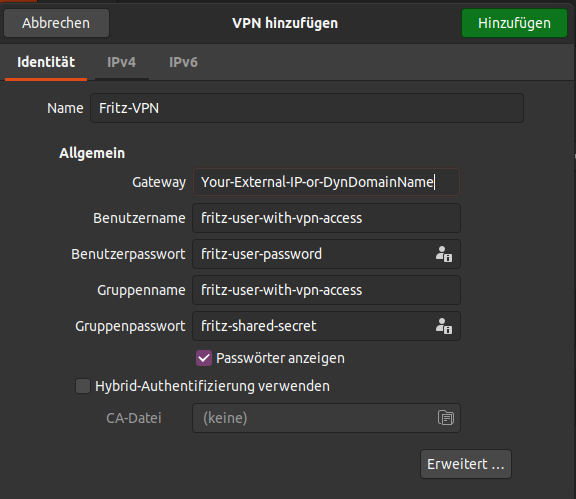
Under Settings choose Network and under VPN add a new connection by clicking on “+”. You have to choose “Cisco-compatible VPN-client (vpnc)“!

That’s all – please test the connection at home e.g. using your mobile phone as a hotspot!

Sources:

https://at.avm.de/service/vpn/tipps-tricks/vpn-verbindung-zur-fritzbox-unter-linux-einrichten/

Nextcloud – updater.secret needed

If you run into the issue needing to enter an ‘updater.secret’ you have to do the following:

Enter the plain-text version of the string assigned to ‘updater.secret’ in your config.php!

If you do not know the plain-text version anymore you can easily run the php-command given by nextcloud in any linux console where php and openssl is installed!

On any Linux Console, where php and openssl is installed, run:

# php -r '$password = trim(shell_exec("openssl rand -base64 48"));if(strlen($password) === 64) {$hash = password_hash($password, PASSWORD_DEFAULT) . "\n"; echo "Insert as \"updater.secret\": ".$hash; echo "The plaintext value is: ".$password."\n";}else{echo "Could not execute OpenSSL.\n";};'

You get the following output:

Insert as "updater.secret": $2y$10$blAGPpTLqAbV0SE8C/KooeeygLEsFVEtMu..m15E2uC8wfqgP6Zhi
The plaintext value is: tIVe8CJhn56TNs4MaEh24ABZPruYQf1nFPM1OqNWMXmNq13k6lQ45kWU+MfCZ4ot

Both strings are just examples! You have to replace them with the ones you generated!

So you have to ensure that within your config/config.php the relevant line is:

'updater.secret' => '$2y$10$blAGPpTLqAbV0SE8C/KooeeygLEsFVEtMu..m15E2uC8wfqgP6Zhi',

and within your web-updater under https://yourdomain.com/updater enter the plaintext:

tIVe8CJhn56TNs4MaEh24ABZPruYQf1nFPM1OqNWMXmNq13k6lQ45kWU+MfCZ4ot

Finally, you should be able to re-enter your web-based Nextcloud Updater!

Freezes with Ryzen 2200G on MSI A320M Pro Max under Linux Mint 19.3

I have the following hardware running Linux Mint 19.3 with most recent kernel (5.3.0-28) and recent BIOS.

However, I had some occasional freezes. Desktop was sill visible with no keyboard or mouse input being possible.

I searched for possible solutions and one thing that seems to have a positive effect so far is to disable certain power states of the CPU. Therefore, I edited the default grub file:

sudo nano /etc/default/grub

Changing the “GRUB_CMDLINE_LINUX_DEFAULT” Line to:

GRUB_CMDLINE_LINUX_DEFAULT="processor.max_cstate=5 idle=nomwait"

After saving that, one has to update grub by:

sudo update-grub

After doing that, it’s obvious that a restart is necessary to activate the changes.

However, another problem appeared: I suffered from a crash to a pure green screen with no text. As I read here, it may be related to the GPU and or the memory clock.

Due to this, I set memory frequency from “AUTO” to 2133 MHz. (I am using 2x 8 GB 2400MHz memory modules.)
I cannot say if that finally helps but I’ll keep reporting that here.

Update: No, no, no – all wrong…

In the meantime I again had sporadic freezes. Then I suspected the USB-Hub I used to be the reason for the freezes. I removed it and had several operating hours without any freezes. Then, however, I got the decisive hint:

I opened an example Project (FirstPersonStarter) in Godot Engine (3.2) and the machine crashed immediately. So this let me think about things I’ve read about the integrated graphics of the Ryzen 2200G under Linux. Two year old postings state that the drivers for the IGP of the Ryzens are quite unstable. However, it seems as if this is still the case.

I digged for my old GeForce 560 Ti and placed it in the narrow desktop case. So far – the example project works and causes no freeze.

My personal summary so far: (needn’t be generally valid)

The integrated graphics of the Ryzen (2nd generation) under Linux is not stable at the moment.

And this is quite a very poor situation for Linux users as this CPU is on the market for 2 years now (since about Q1/2018)!

Configure pi-hole with DNS-over-TLS on an old raspberry pi 1

Installation of pi-hole on a raspberry pi is very easy – installation instructions can be found here:

https://github.com/pi-hole/pi-hole/#one-step-automated-install

Additionally, one might be interested in securing DNS using TLS (DNS-over-TLS) which is well explained here:

https://docs.pi-hole.net/guides/dns-over-https/

However, pi-hole is not very demanding for the hardware. Therefore, an old raspberry pi 1 can easily handle the task of running pi-hole. Nevertheless, I ran into a little “segmentation fault” issue:

pi@pi1:~ $ cloudflared -v
Segmentation fault

This error occurs because newer cloudflare versions are compiled on/for newer ARM devices. To avoid this issue you simply have to replace the “wget”-line in the up above mentioned instruction for the download of cloudflare by an alternative link as explained here!

In clear words instead of:

wget https://bin.equinox.io/c/VdrWdbjqyF/cloudflared-stable-linux-arm.tgz
tar -xvzf cloudflared-stable-linux-arm.tgz

use:

wget https://hobin.ca/cloudflared/releases/2019.8.1/cloudflared_2019.8.1_arm.tar.gz
tar -xvzf cloudflared_2019.8.1_arm.tar.gz

All other steps remain the same.

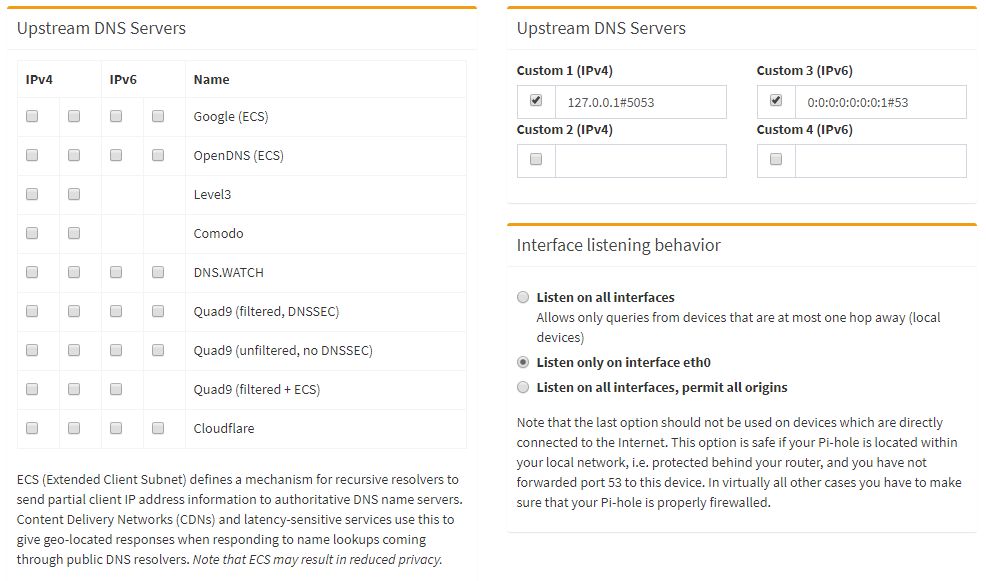
Don’t forget to set the DNS Upstream Servers in the GUI (open your local pi-hole IP-address in your browser) under Settings -> DNS as shown in the following image:

Sonoff S20 mit Tasmota Firmware – Zeitschaltuhr

Ausgangssituation: Es liegt eine Sonoff S20 WLAN-Steckdose mit Tasmota-Firmware vor.

Aufgabe: Steckdose zeitgesteuert an- und ausschalten

Lösung:
Die Tasmota-Firmware ermöglicht das einfache an- und ausschalten per Aufruf einer HTML-Seite. Das ganze geht ohne das aufwendige Einrichten eines Smart-Home Servers.

Mittels eines Linux-Servers, der ggf. ohnehin im Netzwerk ständig läuft – beispielsweise ein Raspberry Pi – lässt sich die besagte WLAN-Steckdose ganz einfach an- und ausschalten.

Zum Einschalten der WLAN-Steckdose (hier beispielhaft mit der IP: 192.168.178.123) erzeugen wir eine Steuerdatei in einem beliebigen Verzeichnis – beispielsweise in /home/pi/sonoff:

cd /home/pi
mkdir sonoff
cd sonoff
echo "wget -O /dev/null -o /dev/null http://192.168.178.123/cm?cmnd=Power%20On" > sonoff_on
chmod u+x sonoff_on

Um die WLAN-Steckdose wieder auszuschalten erzeugen wir noch eine weitere Datei:

echo "wget -O /dev/null -o /dev/null http://192.168.178.123/cm?cmnd=Power%20Off" > sonoff_off
chmod u+x sonoff_off

Anschließend müssen noch zeitgesteuerte Aufrufe der Dateien eingerichtet werden.

Zunächst den Editor der crontab-Datei aufrufen:

crontab -e

Und folgende Zeilen ergänzen – hier sei angenommen, die WLAN-Steckdose soll jeden Tag um 18:03 Uhr eingeschaltet werden:

3 18 * * *     /home/pi/sonoff/sonoff_on

Sowie um 08:12 Uhr wieder abgeschaltet werden:

12 8* * *     /home/pi/sonoff/sonoff_off

Anschließend nicht vergessen, die Änderungen zu speichern! (Strg+X und anschließend Y und ENTER) 🙂

Man kann auch zunächst durch einfachen Aufruf der jeweiligen Dateien das Schalten der Steckdose ausprobieren:

/home/pi/sonoff/sonoff_on

bzw.

/home/pi/sonoff/sonoff_off

Ubuntu 18.04 (Gnome) – Startmenü-Einträge hinzufügen

Falls man eine Anwendung manuell installiert hat und man eine Verknüpfung im Startmenü anlegen möchte, geht das am einfachsten mit dem kleinen Programm “Alacarte”. Zu installieren mit dem Konsolenbefehl:

sudo apt install alacarte

Anschließend findet man das Programm im Startmenü (Symbol mit neun Punkten links unten oder Windows-Taste):

Alacarte über Gnome-Startmenü starten…
Alacarte

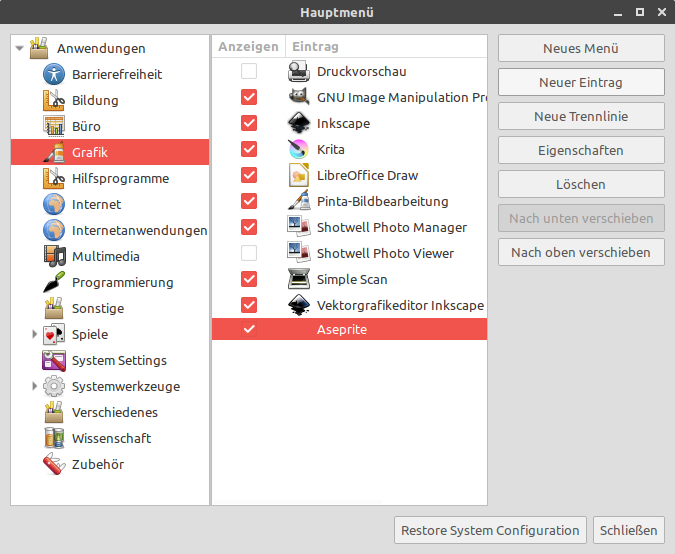
Anwenungs-Kategorie auswählen und auf “Neuer Eintrag” klicken…
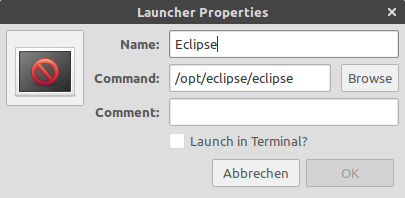
Anschließend öffnet sich folgendes Formular, in das ein Name für das Startmenü und natürlich der Pfad eingegeben werden müssen:

“Neuer Eintrag” in Alacarte

Wenn sowohl Name und auch ein existenter Pfad eingegeben wurden, kann der Eintrag mit OK übernommen werden und sollte anschließend sofort im Startmenü zu finden sein.

Ich wundere mich ja immer wieder, dass für solch elementare Funktionen selbst in einer Linux-Distribution, die sich auch an normale Anwender richtet, eine zusätzliche Software installiert werden muss.